To clamp perpendicular wood, align the pieces at a right angle. Use woodworking clamps to secure them tightly, ensuring a flush joint. Double-check the alignment before tightening completely. This ensures a stable and precise connection for your project.
New to woodworking? Mastering the art of clamping perpendicular wood is a fundamental skill for any beginner. Ensuring precise and secure joints is crucial in creating sturdy and visually appealing projects. In this guide, we'll unravel the mysteries of clamping techniques, providing beginners with essential insights and step-by-step instructions. Say goodbye to uneven joints and wobbly constructions – let's dive into the basics of clamping perpendicular wood for a solid foundation in your woodworking journey.

Perpendicular woodworking joints can be tricky to get right. Your project can quickly look wonky and unprofessional if you're not careful. Here are the six most significant challenges you'll face when clamping perpendicular wood and how to overcome them.
1. Accurate measurements are critical
The first and most crucial step to getting a perfect perpendicular joint is ensuring your measurements are accurate. This sounds like a no-brainer, but it's surprisingly easy to make a mistake when working with long boards or large pieces of lumber. Always measure twice and cut once to be safe.
2. Maintaining a consistent clamping force is key
Once your boards are cut to size, it's time to clamp them together. This is where things can start to go wrong if you're not careful. It's essential to maintain a consistent clamping force throughout the entire process. Otherwise, you'll end up with an uneven joint that doesn't look very nice.
3. Avoiding marring and scratches
When clamping wood together, it's vital to avoid marring and scratching the surface. This can be done by using clamping pads or other protective measures. Otherwise, you'll end up with a ruined project that doesn't look very good.
4. Ensuring even pressure
It's also essential to ensure you're applying even pressure when clamping wood together. If one side is getting more pressure than the other, it can cause the joint to be uneven and weak. Use multiple clamps if needed to distribute the pressure evenly.
5. Dealing with warping and bowing
Warping and bowing are two common problems when working with wood. These issues can make it challenging to get a tight, even joint. The best way to avoid these problems is to use equally thick and straight boards.
6. Preventing glue from seeping out
Another common issue when clamping wood is glue seepage. This can be a significant problem if you're not careful, as it can ruin the finish of your project. To prevent this, use masking tape or other measures to keep glue from seeping out.
Clamping perpendicular wood can be challenging, but it's doable with patience and care. By following these tips, you'll be well on your way to getting perfect joints every time.
How to clamp perpendicular wood?

Clamping perpendicular wood is a common woodworking task, whether you're building furniture, cabinets, or other wooden structures. Properly clamping wood at right angles ensures accurate and secure joints. Here's an in-depth, step-by-step guide to help you achieve this:
Materials and Tools You’ll Need:
- Two pieces of wood that need to be clamped perpendicular to each other.
- Clamps (bar clamps, pipe clamps, or other suitable clamps).
- Carpenter's square or a combination square.
- Pencil or marking tool.
- Screwdriver (if using bar clamps).
Steps:
Step 1: Prepare the Wood:
Ensure that the wood surfaces you're joining are flat, clean, and free of any debris or sawdust. This will help in achieving a tight and secure joint.
Step 2: Mark the Joint:
Use your carpenter's square or combination square to mark the point where the two pieces of wood will meet at a right angle. Make a clear and straight pencil mark on both pieces.
Step 3: Arrange the Wood:
Position the two pieces of wood so that they intersect at the marked point, forming a right angle. Ensure that the edges are flush and that the pieces fit together as tightly as possible.
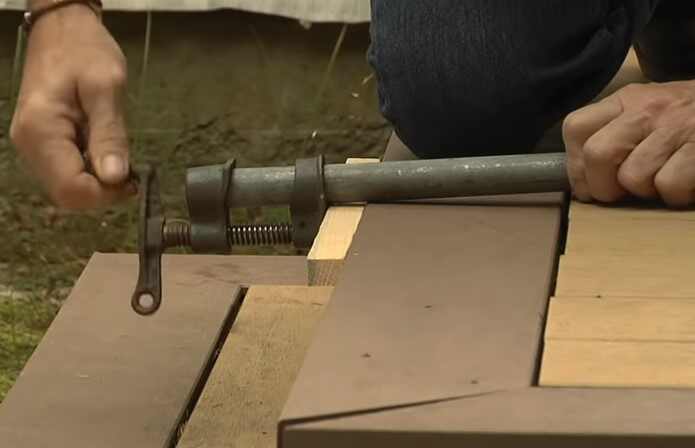
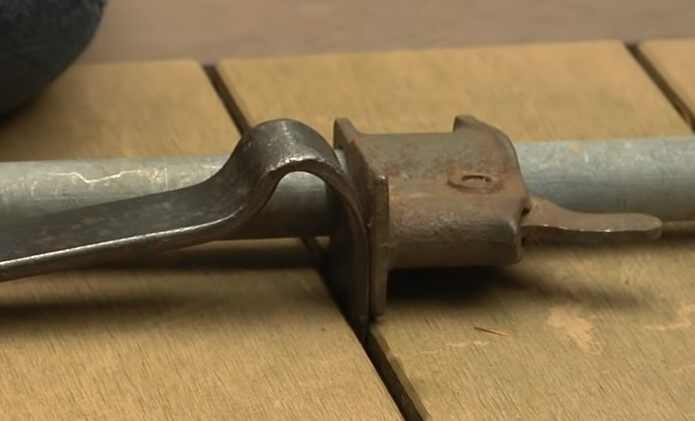
Step 4: Choose and Position Clamps:
Select the appropriate clamps for the job. Bar clamps, pipe clamps, or quick-release clamps are common choices. The number of clamps needed depends on the size and length of the wood pieces.
- For smaller projects, one clamp per piece may be sufficient.
- For larger projects, you may need multiple clamps on each piece to distribute pressure evenly.
Position the clamps as follows:
- Place one clamp on each piece near the joint, ensuring that the jaws of the clamps align with the marked intersection point.
- If using multiple clamps on each piece, space them evenly along the joint.
Step 5: Apply Clamping Pressure:
Tighten the clamps gradually, alternating between them if you have multiple clamps. Apply even pressure on both pieces, drawing them together to close the joint. Ensure that the joint remains flush and square as you tighten the clamps.
Step 6: Check for Squareness:
Use your carpenter's square or combination square to double-check that the joint is perfectly square (90 degrees). Place the square in the corner formed by the two pieces, and ensure that both edges of the square sit flush against the wood.
Step 7: Final Adjustments:
If the joint is not perfectly square, make any necessary adjustments before the glue dries or before you continue with your project. You can tap the wood pieces gently with a mallet or reposition the clamps as needed.
Step 8: Allow for Drying:
If you're using glue, allow sufficient time for it to dry according to the manufacturer's recommendations before removing the clamps. Typically, this can take anywhere from a few hours to overnight.
Step 9: Remove Clamps:
Once the glue has dried and the joint is secure, carefully release and remove the clamps. Be gentle to avoid damaging the wood or the joint.
You have successfully clamped perpendicular wood. Your joint should be strong, square, and ready for further woodworking or finishing as needed.
Best way to avoid damaging the wood when clamping perpendicularly-cut pieces together
Clamping perpendicular-cut wood pieces together can be a delicate operation to avoid damaging the wood. Here are some tips to help you do it effectively while minimizing the risk of damage:
1. Use Protective Pads:
Place soft, non-marring pads or blocks between the clamps and the wood surface. Felt, leather or rubber pads work well for this purpose. This helps distribute the clamping pressure evenly and prevents indentations or marks on the wood.
2. Even Pressure Distribution:
Make sure the pressure from the clamps is evenly distributed across the entire surface you are clamping. Use multiple clamps, if necessary, spaced evenly along the length of the joint. This prevents localized pressure that can lead to wood deformation.
3. Adjust Clamping Pressure:
Apply clamping pressure gradually, tightening the clamps a little at a time, moving from one end to the other. This allows the wood fibers to adjust to the pressure evenly and reduces the risk of damaging the wood.
4. Parallel Clamps:
Parallel clamps (also known as F-style clamps) are excellent for perpendicular joints. They exert even pressure and are less likely to cause wood distortion compared to some other clamp types.
5. Use Cauls:
Cauls are flat boards or panels that you place on the wood surface before clamping. They help distribute pressure more evenly and reduce the risk of wood damage. Make sure the cauls are flat and smooth to avoid any marks on the wood.
6. Properly Prepare the Wood:
Ensure that the mating surfaces of the wood are flat, smooth, and free from any debris. Rough or uneven surfaces can lead to localized pressure points and potential damage during clamping.
7. Protect End Grain:
The end grain of wood is more vulnerable to damage when clamped. To protect it, consider applying a thin layer of glue before clamping or using a small piece of wood with a matching angle to support the end grain during clamping.
8. Controlled Clamping Pressure:
If using a clamp with a tensioning mechanism, use it carefully to avoid over-tightening. Some clamps have pressure indicators that can help you gauge the appropriate pressure.
9. Dry Fit First:
Before applying glue and clamping, perform a dry fit to ensure that the pieces align properly. This allows you to make any necessary adjustments before applying clamping pressure.
10. Slow Drying Glue:
Consider using slow-drying or extended-open-time wood glue. This gives you more time to adjust the pieces and the clamps before the glue sets.
By following these tips and taking care when clamping perpendicular-cut wood pieces together, you can minimize the risk of damaging the wood while achieving a strong and secure joint.
What are some of the benefits of clamping perpendicular wood?
A clamp is an essential tool for woodworkers as it helps to secure pieces of wood together while they are being worked on. Clamping perpendicular wood is a technique that is often used to create a strong and secure joint. This method is beneficial when working with large or heavy pieces of wood. There are several benefits to clamping perpendicular wood, which include:
1. Increased Strength and Stability
The joint between two pieces of wood clamped at a 90-degree angle is significantly stronger than if they were glued together. This is because the clamping force is evenly distributed across the joint rather than concentrated in one area. This makes the joint less likely to shift or move and increases its strength and stability.
2. Greater Surface Contact
Another benefit of clamping perpendicular wood is that it allows for greater surface contact between the two pieces of wood. This is important because it helps to create a stronger bond between the two pieces, which can further increase the strength and stability of the joint.
3. Reduced Risk of Glue Joints Slipping
When the glue is applied to two pieces of wood that are not clamped together, there is always a risk that the glue will slip and cause the joint to become misaligned. However, this risk is significantly reduced when the wood is clamped together at a 90-degree angle. This is because the clamping force helps to hold the glue in place, preventing it from slipping.
4. Faster Drying Time
Another benefit of clamping perpendicular wood is that it can help speed up the glue's drying time. When two pieces of wood are glued together without being clamped, the glue tends to seep between the boards. This can cause the joint to take longer to dry and increase the risk of the joint becoming misaligned. However, when the wood is clamped together at a 90-degree angle, this problem is eliminated.
5. Greater Precision
When clamping perpendicular wood, achieving a tight and precise joint is much easier. This is because the boards are held in place by the clamping force, allowing for greater accuracy when aligning the boards. This is especially important when working with small or delicate pieces of wood.
Tips for beginners when clamping perpendicular wood
Clamping perpendicular wood is a common task in woodworking, whether you're joining pieces at a right angle to create corners or making various types of assemblies. Here are some tips for beginners to ensure a successful and secure clamp:
1. Choose the Right Clamp Type:
There are various types of clamps available, including bar clamps, pipe clamps, C-clamps, F-clamps, and more. Select the appropriate clamp type based on the size and shape of your workpiece and the specific joint you're creating.
2. Prepare Your Workpieces:
Ensure that the surfaces you're clamping are flat, smooth, and clean. Any irregularities or debris on the wood can affect the quality of the joint.
3. Mark Your Clamping Locations:
Mark the locations where you intend to place your clamps. This helps ensure that you position the clamps correctly and apply even pressure to the joint.
4. Use Clamping Blocks:
To prevent damage to your workpiece, place clamping blocks or scraps of wood between the clamp jaws and the workpiece. These blocks distribute pressure evenly and prevent indentations or dents.
5. Apply Even Pressure:
When tightening the clamps, apply even pressure on both sides of the joint to ensure a tight fit. If you notice that the joint is not coming together evenly, adjust the clamps as needed.
6. Check for Squareness:
To ensure your joint is perfectly square, use a carpenter's square or a combination square to check the angle at the corner. Adjust the clamps as necessary until the joint is square.
7. Use the Right Number of Clamps:
Depending on the size and complexity of your project, you may need multiple clamps. Generally, it's better to use more clamps spaced evenly along the joint rather than relying on just one.
8. Monitor Glue Squeeze-Out:
When using glue for your joint, be prepared for excess glue to squeeze out from the joint as you tighten the clamps. Have a damp cloth or sponge on hand to wipe away excess glue before it dries.
9. Allow for Drying Time:
After clamping, follow the manufacturer's recommended drying time for the glue you used. Rushing the drying process can compromise the strength of the joint.
10. Practice and Patience:
Clamping accurately takes practice. Don't be discouraged if your first few attempts aren't perfect. With time and experience, you'll improve your clamping skills.
11. Safety First:
Always wear appropriate safety gear, such as safety glasses and hearing protection, when working with woodworking tools and clamps. Additionally, be cautious when tightening clamps to avoid over-tightening and damaging the wood.
Remember that the success of your woodworking projects often depends on the quality of your clamping technique, so take your time and pay attention to detail. As you gain experience, you'll become more proficient at achieving strong and precise perpendicular wood joints.
Final Words
Perpendicular clamping is a vital woodworking technique that allows you to create strong joints and ensure a precise fit. Following the steps outlined above, you can easily clamp perpendicular wood in your shop. With a little practice, you'll be able to master this essential woodworking skill.