To clamp a 90-degree angle, use a carpenter's square to ensure accuracy. Align the square along the edges, then secure it with clamps. Double-check the angle before tightening to guarantee precision in woodworking or metalworking projects.
Mastering the art of clamping a precise 90-degree angle is a foundational skill for woodworking and various DIY projects. For beginners, achieving this right angle can be a daunting task, but fear not. In this guide, we'll unravel the mystery behind securing a perfect 90-degree angle with ease. Whether you're a novice woodworker or just diving into the world of DIY, this step-by-step tutorial will equip you with the knowledge to tackle your projects with confidence. Let's dive straight into the essentials!

When it comes to woodworking, a 90 degree angle is an essential measurement. This is the angle at which two pieces of wood meet, and it's vital that this angle is precise to create a strong and sturdy joint. There are a few different ways to clamp a 90 degree angle, but the most important thing is to ensure that the clamp is tight and secure. Here are five reasons why it's so important to clamp a 90 degree angle:
1. To create a strong and sturdy joint
When two pieces of wood are joined together at a 90 degree angle, it creates a strong and sturdy joint. This is because the two pieces of wood are locked into place and can't move around. If the joint isn't clamped correctly, then the pieces of wood can move and shift, weakening the joint.
2. To prevent gaps
If you don't clamp a 90 degree angle correctly, then there's a chance that gaps will form between the two pieces of wood. These gaps can be unsightly and cause the joint to be weaker. By clamping the joint tightly, you can prevent these gaps from forming.
3. To avoid splintering
When two pieces of wood are joined together at a 90 degree angle, it's crucial to avoid splintering. The wood can splinter and break if the joint isn't clamped correctly. This can ruin your project and make it unsafe to use.
4. To get a precise measurement
When you're working with wood, precision is key. A 90 degree angle must be exact for the project to look its best and function properly. If the angle isn't clamped correctly, the measurement will be off, and the project won't look right.
5. To save time and money
Clamping a 90 degree angle correctly can save you time and money in the long run. If you don't clamp the joint correctly, you'll have to redo the project or buy new materials. This can be frustrating and costly. By taking the time to clamp the joint correctly, you can avoid these problems.
Related: When clamping 22.5 degree angles, what should I do?
What are some of the challenges when clamping a 90 degree angle?
A few challenges need to be considered when clamping a 90 degree angle. These can include the following:
1. Ensuring the accuracy of the angle
When clamping a 90 degree angle, it is essential to ensure that the angle is accurate. This can be done by using a protractor or a square. If the angle is not accurate, it can result in the piece not fitting together correctly or not looking symmetrical.
2. Having enough clamping force
Another challenge when clamping a 90 degree angle has enough clamping force. This is because the clamps need to hold the pieces together tightly to maintain the angle. If there is insufficient clamping force, the pieces may move, and the angle may no longer be 90 degrees.
3. Avoiding damage to the piece
When clamping a 90 degree angle, it is also essential to avoid damaging the piece. This can be done by using soft clamps or pads on the clamps. Damage to the piece can occur if the clamps are too tight or if they slip during clamping.
4. Ensuring that the clamps do not slip
Another challenge when clamping a 90 degree angle is ensuring that the clamps do not slip. This can be done using clamps with teeth or using two clamps per side. If the clamps slip, it can cause the piece to become misaligned, and the angle may no longer be 90 degrees.
5. Avoiding gaps in the joint
When clamping a 90 degree angle, it is also important to avoid gaps in the joint. This can be done by using cauls or taping the pieces together before clamping. Gaps in the joint can result in an uneven appearance or air pockets forming.
Related: If you are interested in bar clamps, you might find them useful
How to clamp a 90 degree angle?
Clamping a 90-degree angle can be useful in woodworking, metalworking, and various DIY projects to ensure precise and square joints. Here are some steps to help you clamp a 90-degree angle:
Materials and Tools You’ll Need:
- Two pieces of material (e.g., wood, metal) that you want to join at a 90-degree angle.
- Carpenter's square or try square.
- Clamps (e.g., bar clamps, C-clamps, corner clamps).
- Pencil or marking tool.
- Safety gear (gloves, safety glasses, etc.).
Steps:
1. Prepare Your Materials:
Ensure the two pieces of material you want to join have clean, straight edges. Cut the pieces to the desired length using a saw or other appropriate cutting tools if necessary. Sand or trim any rough or uneven edges to create flat surfaces for the joint.
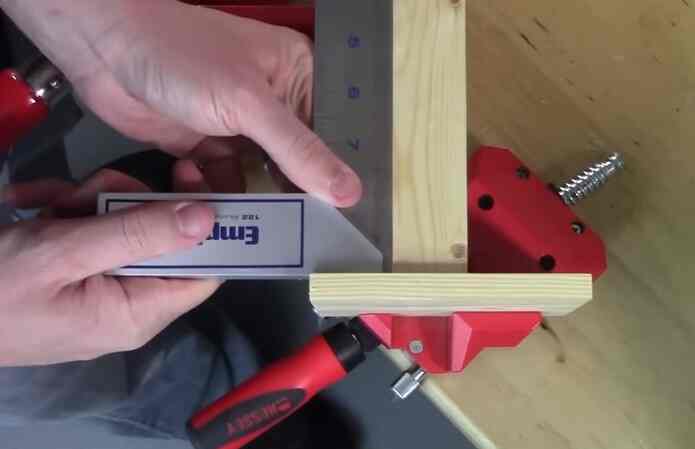
2. Mark the 90-degree angle:
Place the two pieces of material on a flat surface with one edge of each piece butted up against each other, forming a rough 90-degree angle.
Use a carpenter's square or try square to verify the angle is precisely 90 degrees. If not, adjust the pieces until you achieve the correct angle.
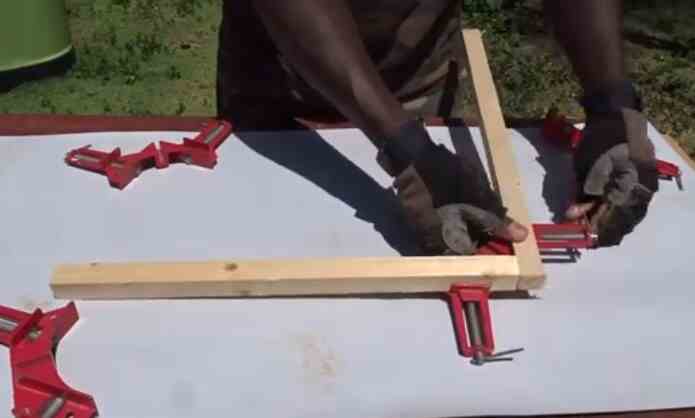
3. Secure the Pieces Temporarily:
- While holding the pieces in place, use a pencil or marking tool to draw a line along the edge where the two pieces meet. This line will be a reference for repositioning the pieces if they shift while clamping.
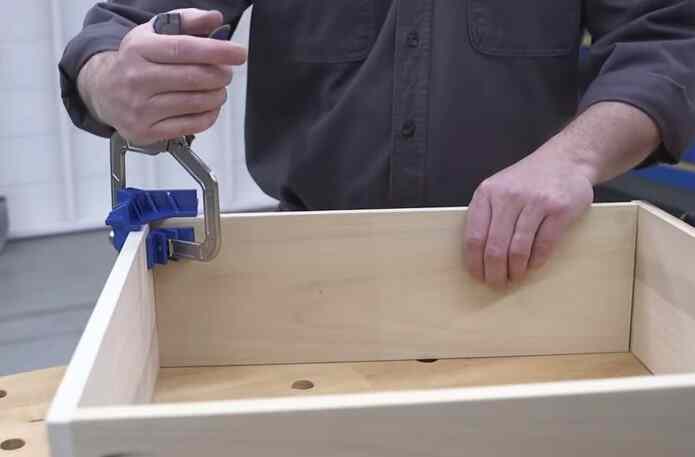
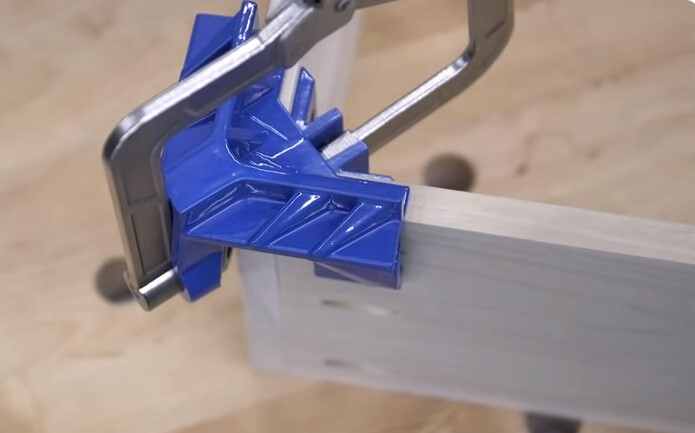
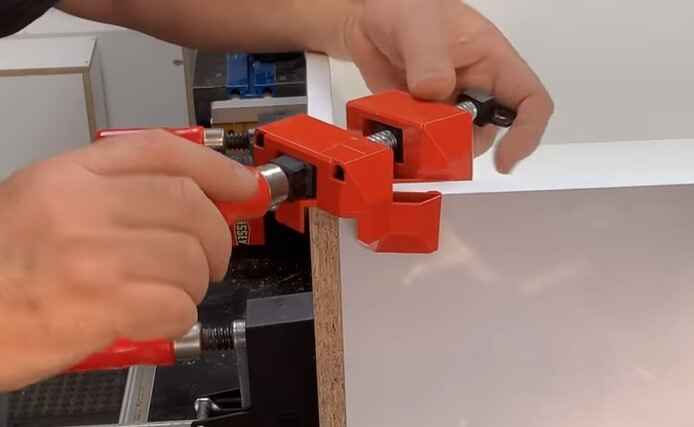
4. Apply Clamps:
Place clamps to secure them together with the pieces aligned at the 90-degree angle and the reference line visible.
Make sure the clamps are positioned so they apply pressure to hold the pieces tightly at the joint.
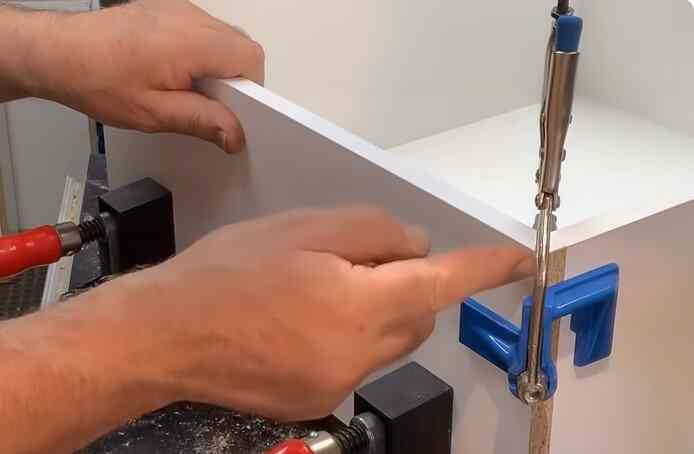
5. Check for Squareness:
Recheck the angle using the carpenter's square or try square to ensure it remains at a perfect 90 degrees.
Make any necessary adjustments by tapping the pieces with a mallet or adjusting the clamps until the angle is correct.
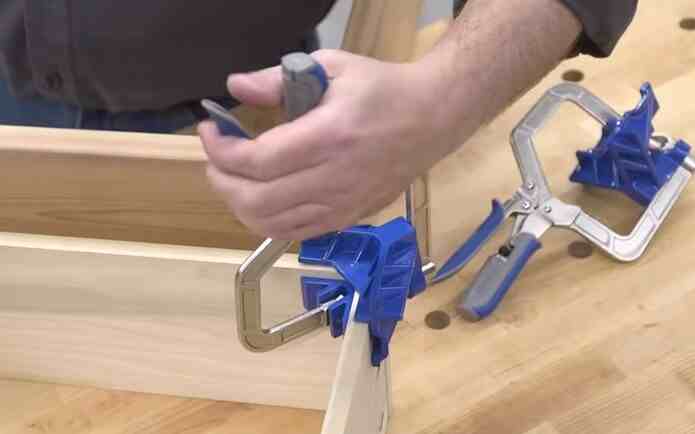
6. Tighten the Clamps:
Gradually tighten the clamps until the joint is secure and the angle remains 90 degrees.
Be careful not to overtighten, as this can deform the materials or weaken the joint.
7. Allow for Drying or Bonding (if applicable):
Depending on the project and materials used, you may need to allow glue or adhesive to dry or weld metal pieces together as per the manufacturer's instructions.
8. Remove Excess Glue or Adhesive (if applicable):
If you used glue or adhesive, wipe away any excess that squeezes out from the joint before it dries.
9. Final Check:
Double-check the angle one last time after allowing any adhesives to set or the joint to stabilize.
Following these steps, you can clamp a 90-degree angle accurately and securely for your project. Remember always to wear appropriate safety gear and take your time to ensure precision.
What are some of the benefits of clamping a 90 degree angle?
Clamping a 90 degree angle is a handy way to ensure that your woodworking project turns out perfectly. Here are five benefits of clamping a 90 degree angle:
1. Guarantees Perfectly Square Corners
When working with wood, it's important to have perfectly square corners. Otherwise, your project will look wonky and unprofessional. Clamping a 90 degree angle ensures that your corners are nice and square.
2. Prevents Warping
Warping is a huge problem when working with wood. It can ruin your whole project and cause a lot of frustration. Clamping a 90 degree angle prevents the wood from warping and ruining your hard work.
3. Ensures Straight Lines
Another essential element of any woodworking project has straight lines. Crooked lines will make your project look sloppy and unprofessional. When you clamp a 90 degree angle, it ensures that your lines are nice and straight.
4. Makes Glueing Easier
When you're gluing wood together, it's important to have a tight bond. Otherwise, the wood will come apart easily. Clamping a 90 degree angle makes it easier to get a tight bond so that your glue holds up.
Related: What is the recommended clamping time for wood glue?
5. Saves Time
Clamping a 90 degree angle saves you time in the long run. It might take a few extra minutes, but it will save you from having to redo your whole project because of wonky corners or crooked lines. In the end, clamping a 90 degree angle is definitely worth the effort.
How do you know if you’ve clamped a 90 degree angle correctly?
There are several ways to know if you've clamped a 90 degree angle correctly. One way is to use a square or triangle to check the angle. If the two lines forming the angle are perfectly perpendicular, it's a 90 degree angle.
Another way to test for a 90 degree angle is by using a level. If the bubble is in the center of the level, your angle is 90 degrees.
Finally, you can also use a protractor to measure the angles. If all of the angles on your protractor measure at precisely 90 degrees, then your angles are correct.
Tips for clamping a 90 degree angle
Are you working on a project that requires precise 90-degree angles? Clamping is the best way to achieve clean, sharp corners. But if you've never done it before, the process can seem a bit daunting. Here are some tips to help you clamp like a pro.
1. Use the right clamps
For a 90-degree angle, you'll need two clamps at least as long as the width of your material. I recommend using F-style or C-style clamps, as they provide more surface area for a secure grip.
2. Make sure the jaws are parallel
Before you clamp, check to ensure that the clamp's jaws are parallel. This will ensure that your material is held at a consistent 90-degree angle.
3. Use a spacer block
If you're working with thin material, you may want to use a spacer block to prevent the clamp's jaws from marring the surface. To do this, place the block between the jaws and clamp as usual.
4. Predrill holes
If you're working with hardwood or another difficult-to-penetrate material, predrilling holes for the clamp bolts can make your life much easier.
5. Use cauls
Cauls are pieces of wood that help to distribute the clamping force evenly. They're especially helpful when clamping long or irregularly shaped pieces.
6. Don't overtighten
When in doubt, it's better to err on the side of too loose rather than too tight. If you overtighten the clamp, you risk distorting your material.
With these tips in mind, you'll be able to achieve perfect 90-degree angles every time!
What are some projects that require a 90-degree clamp?
If you need to secure two pieces of wood at a 90-degree angle, you will need a clamp. There are all sorts of clamps on the market with different capabilities, but if you're looking for a versatile clamp that can handle various projects, you need a 90-degree clamp. Let's look at some of the best projects for a 90-degree clamp.
1. Woodworking projects
Woodworking is a popular hobby for many people, and there are a variety of different woodworking projects that can be undertaken. A 90-degree clamp can be useful for many types of woodworking projects, such as creating boxes, shelves, or other structures.
2. Metalworking projects
Metalworking is another popular hobby, and several projects can be undertaken with a 90-degree clamp. For example, a 90-degree clamp can secure two pieces of metal together while welding or create a tight seal when soldering.
3. Automotive projects
Many different automotive projects can be completed with a 90-degree clamp. For example, a 90-degree clamp can secure two pieces of metal together while welding or create a tight seal when applying epoxy to a car body.
4. Home improvement projects
A 90-degree clamp can be a useful tool for many different types of home improvement projects. For example, a 90-degree clamp can secure two pieces of wood together while gluing or create a tight seal when caulking.
5. Electronics projects
Electronic projects often require the use of a 90-degree clamp. For example, a 90-degree clamp can secure two pieces of metal together while soldering or create a tight seal when applying epoxy to an electronic circuit board.
6. Craft projects
A 90-degree clamp can be helpful for many types of craft projects. For example, a 90-degree clamp can secure two pieces of fabric together while sewing or create a tight seal when gluing.
7. Miscellaneous projects
Several other projects can be completed with a 90-degree clamp. For example, a 90-degree clamp can secure two pieces of material together while painting or create a tight seal when applying adhesive.
Final Words
So there you have it, a foolproof guide to clamping a 90 degree angle. By following these simple steps, you'll be on your way to becoming a master craftsman in no time. And who knows, maybe one day you'll teach someone else how to clamp a 90 degree angle. Thanks for reading!