Renovating or refinishing hardwood floors can breathe new life into your living space, providing a timeless and elegant appeal. Among the crucial steps in this process, sanding stands out as a cornerstone, essential for achieving a smooth, polished, and long-lasting finish. Whether you're a seasoned DIY enthusiast or embark on your first home improvement project, mastering the art of sanding hardwood floors is worth acquiring.
In this comprehensive guide, I'll explore the techniques and tools required to achieve a pristine surface on your hardwood floors. From the precision of an orbital sander to the power of a belt sander, the versatility of a drum sander, and the finesse of a hand sander, I will delve into each method to help you choose the one that suits your project best.
Sanding hardwood floors is a multi-step process that demands patience, attention to detail, and a fundamental understanding of the tools at your disposal. Whether you're looking to remove old finishes, smooth out imperfections, or prepare your floors for a fresh coat of stain and finish, you'll find the guidance you need within this step by step guide.

Sanding hardwood floors is a crucial step in the process of refinishing them. Over time, hardwood floors can become scratched, worn, or damaged, and sanding is done to restore their appearance and durability. Here are some reasons why sanding hardwood floors is necessary:
Removal of Imperfections:
Sanding helps remove imperfections like scratches, gouges, dents, and stains from the surface of the hardwood. This process levels the floor, creating a smooth and even surface.
Surface Preparation:
Sanding also prepares the surface of the wood for finishing. It removes the existing finish, including any old varnish, paint, or stains, making it easier for the new finish to adhere properly.
Reviving Appearance:
Sanding reveals the natural beauty of the hardwood by removing the worn-out top layer. This can significantly improve the floor's aesthetics, making it look new.
Improving Durability:
Sanding removes the top layer of wood, which may have suffered wear and tear over the years. By exposing fresh wood beneath, the floor becomes more resilient and better able to withstand daily use.
Even Stain Absorption:
Sanding ensures that stains and finishes are absorbed evenly into the wood, preventing blotchiness or uneven coloration.
Leveling Uneven Areas:
If your hardwood floor has uneven areas due to warping or other factors, sanding can help level them out, providing a more uniform surface.
Repairing Damage:
In some cases, sanding can fix minor damage to the wood, such as shallow gouges and scratches. Deeper damage may require more extensive repairs or replacement of individual boards.
Customization:
Sanding allows you to customize the appearance of your hardwood floors. You can choose the level of smoothness and determine how much of the natural wood grain you want to showcase.
Can I sand hardwood floors myself?
Yes, you can sand hardwood floors yourself, but it's essential to understand that refinishing them is labor-intensive and skill-dependent. If you're confident in your DIY skills and have the necessary equipment and time, it can be a cost-effective way to improve the appearance of your floors.
How to Sand Hardwood Floors with Orbital Sander
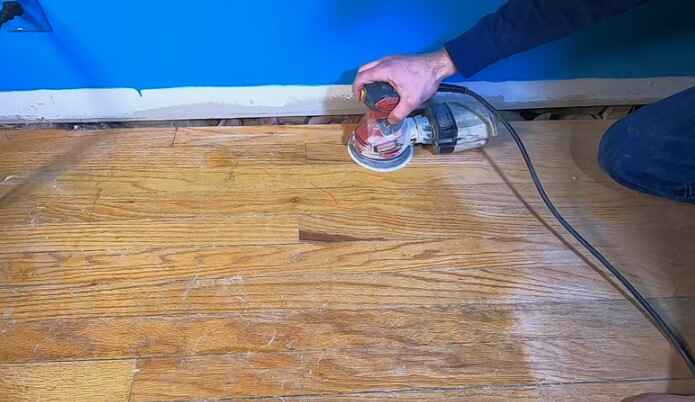
Sanding hardwood floors with an orbital sander is a common DIY project that can breathe new life into your wood floors. Here's a step-by-step guide to help you get started:
Tools and Materials:
- Orbital sander: You'll need a quality orbital sander. A random orbital sander is a good choice because it's less likely to leave swirl marks on the wood.
- Sanding discs: Choose the appropriate grit sandpaper discs for your project. You'll typically start with a coarser grit (around 36-60) and work your way to finer grits (80-120) for a smooth finish.
- Safety gear: Wear safety goggles, a dust mask, and hearing protection to protect yourself from dust and noise.
- Vacuum cleaner: A shop vacuum with a dust collection bag is essential to keep the area clean and minimize dust.
- Extension cords: Depending on the size of your room, you may need extension cords to reach all areas.
Step-by-Step Guide:
- Prepare the room: Remove all furniture, rugs, and obstacles from the room. This will give you a clear working area and prevent damage to your belongings.
- Inspect the floor: Examine the hardwood floor for any nails or staples that may be protruding. These need to be hammered down or removed to prevent damage to your sander and sandpaper.
- Start with coarse grit: Begin sanding with the coarsest grit sandpaper (e.g., 36 or 60). Attach it to the orbital sander according to the manufacturer's instructions. Start in one corner of the room and work across the floor, sanding in the direction of the wood grain. Overlap each pass slightly to ensure even sanding. Keep the sander moving to avoid creating gouges or swirls.
- Vacuum frequently: Dust and debris will accumulate quickly. Use the vacuum to clean the floor often. A clean surface allows for more effective sanding.
- Change sandpaper: Replace it with the next finer grit when it becomes clogged or worn down. Gradually work up to finer grits until you achieve the desired smoothness. Typically, you'll progress from coarse to medium (e.g., 80-100) to fine (e.g., 120).
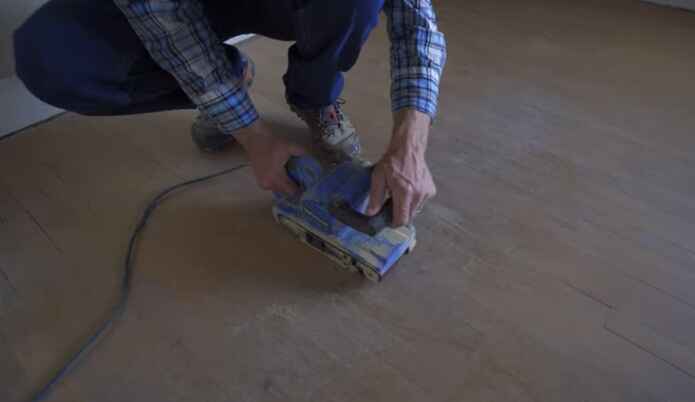
- Edge sanding: An orbital sander can't reach the room's edges, so you'll need an edge sander or a handheld sander for these areas. Use the same grit sequence as before, starting with a coarse grit and working your way up to a fine grit.
- Hand sanding: In tight corners and along walls where the sander can't reach, use sandpaper wrapped around a sanding block or a pole sander to finish these areas.
- Inspect and clean: Once you've finished sanding with the finest grit, inspect the floor for any imperfections or areas that need touch-ups. Clean the entire room thoroughly to remove all dust.
- Apply finish: After sanding, you can apply your chosen finish, such as stain and polyurethane, to protect and enhance the wood. Follow the manufacturer's instructions for your desired finish.
- Allow to dry: Let the finish dry completely, which can take several hours to a few days, depending on the product.
Pro Tips:
Remember that sanding hardwood floors can be a labor-intensive process, and it's essential to maintain a consistent sanding technique and be patient to achieve a smooth, even finish. If you're uncomfortable with the process or have a large or complex project, consider hiring a professional floor refinisher.
How to Sand Hardwood Floors with a belt sander
Sanding hardwood floors with a belt sander is a DIY project that can breathe new life into your flooring. However, it's essential to approach the task cautiously and follow proper techniques to avoid damaging your floors. Here's a step-by-step guide on how to sand hardwood floors with a belt sander:
Materials and Tools You’ll Need:
- Belt sander with appropriate sandpaper grit (start with coarse grit, e.g., 36-60, and progress to finer grits like 80-100)
- Dust mask or respirator
- Safety goggles
- Ear protection (optional but recommended)
- Knee pads or a kneeling pad
- Floor edger or orbital sander (for edges and corners)
- Sandpaper for the edger (same grit sequence as the belt sander)
- Vacuum cleaner with a HEPA filter
- Broom and dustpan
- Plastic sheeting to cover doorways and protect adjacent rooms from dust
Step-by-Step Guide:
1. Prepare the Room:
- Remove all furniture, rugs, and obstacles from the room.
- Cover doorways and vents with plastic sheeting to prevent dust from spreading to other areas of your home.
- Ensure there are no protruding nails or staples on the floor. If you find any, remove or hammer them down.
2. Safety Gear:
- Put on your safety goggles, dust mask, and ear protection to protect yourself from dust and noise.
3. Belt Sander Setup:
- Install the appropriate grit sandpaper on the belt sander. Start with a coarse grit (e.g., 36-60) to remove the old finish and imperfections.
- Plug in the sander and ensure the power cord is behind you to avoid tripping over it.
4. Sand with the Belt Sander:
- Begin in one corner of the room and work across the floor, going with the wood grain.
- Keep the sander moving steadily but slowly. Never let the sander sit in one spot, as it can create uneven sanding.
- Overlap each pass slightly to ensure even sanding.
- Be cautious not to tilt the sander, which can create gouges or uneven areas.
- Start with the coarsest grit and work to finer grits for a smoother finish.
- As you progress to finer grits, change the sandpaper on the belt sander accordingly.
- Vacuum the dust and debris between each grit change to keep your work area clean.
5. Edge and Corner Sanding:
- Use a floor edger or orbital sander to sand the edges and corners of the room where the belt sander cannot reach.
- Follow the same grit sequence as the belt sander.
- Hand sand any tight corners or areas the edger can't reach.
6. Clean Up:
- Vacuum the entire room thoroughly with a vacuum cleaner equipped with a HEPA filter to capture fine dust.
- Sweep the floor with a broom and dustpan to remove any remaining debris.
7. Inspect and Prepare for Finishing:
- Check the floor for any imperfections or areas that may need additional sanding.
- Once satisfied with the sanding results, you can apply the desired finish, such as staining and sealing the hardwood floor.
How to Sand Hardwood Floors with a drum sander
Sanding hardwood floors with a drum sander can be a challenging but rewarding DIY project. Following the proper steps and safety precautions is essential to achieve a smooth and professional-looking finish. Here's a step-by-step guide on how to sand hardwood floors with a drum sander:
Tools and Materials You’ll Need:
- Drum sander (rent from a tool rental store)
- Ear protection
- Safety goggles
- Dust mask or respirator
- Knee pads
- Hardwood floor sandpaper (start with 36-grit, then progress to finer grits like 60, 80, and 100)
- Extension cord (if needed)
- Shop vacuum or dust collection system
- Tack cloth or a damp mop
- Masking tape or painter's tape
- Edge sander (optional for edges and corners)
Safety Precautions:
- Always wear appropriate safety gear, including ear protection, safety goggles, a dust mask or respirator, and knee pads.
- Ensure the work area is well-ventilated, and consider sealing off adjacent rooms to prevent dust from spreading.
- Remove or cover all furniture and fixtures in the room.
- Check the hardwood floor for any protruding nails, and either remove them or set them below the surface to avoid damaging the sandpaper.
Steps to Sand Hardwood Floors with a Drum Sander:
1. Prepare the Room:
- Remove all furniture and obstructions from the room.
- Close off adjacent rooms with plastic sheeting or tape to minimize dust migration.
- Vacuum the floor thoroughly to remove any loose dirt and debris.
2. Start with Coarse Grit Sandpaper:
- Begin sanding on the drum sander with the coarsest grit sandpaper (usually 36-grit).
- Make sure the sander is unplugged before attaching the sandpaper.
- Follow the manufacturer's instructions to secure the sandpaper onto the drum.
- Start in a corner of the room and sand in the direction of the wood grain, moving slowly and evenly across the floor.
- Overlap each pass slightly to ensure even sanding.
- Keep the sander moving at all times to prevent gouges or uneven spots.
3. Progress to Finer Grits:
- After sanding the entire floor with the coarse grit, switch to a finer grit (e.g., 60 grit).
- Repeat the sanding process, moving to progressively finer grits (80-grit and 100-grit).
- Each pass should remove the scratches left by the previous grit, resulting in a smoother surface.
4. Edge Sanding (Optional):
- Use an edge sander or a handheld orbital sander for areas the drum sander can't reach, like edges and corners.
- Use the same grit progression as with the drum sander.
5. Remove Dust:
- Vacuum the entire room to remove dust and debris. A shop vacuum or a dust collection system is ideal for this task.
- Wipe the floor with a tack cloth or a damp mop to remove any remaining dust.
6. Inspect and Repeat (if necessary):
- Check the floor for any imperfections or uneven spots.
- Repeat the sanding process with the finest grit to achieve a smooth, even surface.
7. Finish the Floor:
- You can now proceed with staining and applying a finish to your hardwood floor, following the manufacturer's instructions for your chosen products.
Editor's Tip:
Sanding hardwood floors with a drum sander requires patience and precision. If you're uncomfortable with the process, hiring a professional to ensure a high-quality result is advisable.
Tips on Sanding Hardwood Floors
Sanding hardwood floors is crucial in refinishing them to bring back their natural beauty. Here are five practical tips to help you achieve the best results:
1. Prepare the Room:
Before you start sanding, clear the room of all furniture, rugs, and other items. Cover doorways and vents to prevent dust from spreading to other parts of your home. Seal off any openings with plastic sheeting to create a containment area.
2. Use the Right Equipment:
Invest in or rent professional-grade sanding equipment for the best results. Typically, you'll need a drum sander for the primary sanding and an edge sander for the corners and edges. Ensure that you have the appropriate grit sandpaper for each stage of sanding, starting with a coarser grit (e.g., 36-60) and progressing to finer grits (e.g., 100-120) for a smooth finish.
3. Work Methodically:
Start with the coarsest grit sandpaper to remove the old finish and level any uneven areas. Always move the sander with the wood grain and make overlapping passes to avoid creating uneven patches. Gradually work through finer grits, changing the sandpaper until you achieve the desired smoothness.
4. Keep Dust Under Control:
Dust control is crucial for a clean and healthy working environment. Consider using a dust containment system, such as a vacuum attachment for your sanders to capture most of the dust. Additionally, wear a dust mask, safety goggles, and hearing protection. Ventilate the room by opening windows and doors and use fans to help dissipate airborne particles.
5. Inspect and Clean:
After each sanding pass, inspect the floor for imperfections or areas that need extra attention. Use a handheld orbital sander or a sanding block for spot sanding as necessary. Once you've completed the final sanding with the finest grit, thoroughly vacuum and tack cloth the floor to remove all dust and debris before applying the finish.
Bonus Tip: Choose the Right Finish
Once the sanding is complete, choose a finish that suits your preferences and lifestyle. Options include polyurethane, oil-based finishes, or water-based finishes. Follow the manufacturer's instructions for applying and curing the finish, and allow it to dry completely before moving furniture back into the room.
How to Seal Hardwood Floors?
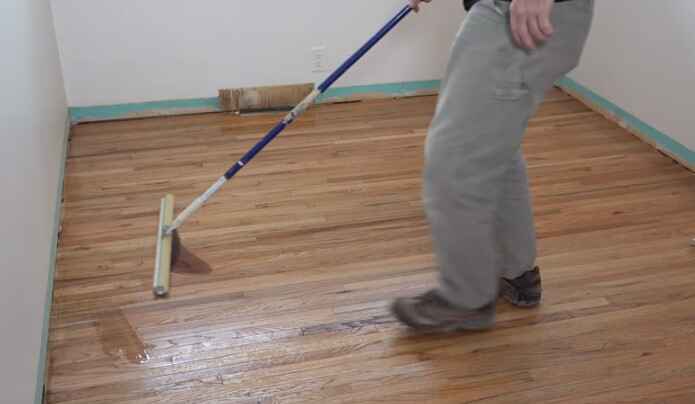
To seal hardwood floors, follow these steps:
- Clean: Remove dirt and debris from the floor with a broom and vacuum. Clean any stains or spills with a wood-safe cleaner.
- Sand: Sand the floor lightly to smooth out imperfections and create a uniform surface.
- Choose the finish: Select an appropriate finish, like polyurethane, oil-based, or water-based sealant, based on your preferences and needs.
- Apply the sealant: Use a paint roller or brush to apply a thin, even coat of sealant. Allow it to dry per the manufacturer's instructions.
- Sand and repeat: Sand lightly between coats and apply 2-3 coats for optimal protection.
- Dry thoroughly: Let the final coat dry completely before moving the furniture back.
Your hardwood floors are now sealed and protected.
How to make wood floors shine naturally
To naturally make wood floors shine, follow these steps:
1. Clean Thoroughly:
Begin by sweeping or vacuuming the floor to remove dust and debris. Then, mop with warm water and a few drops of mild dish soap or vinegar. Ensure the mop is only slightly damp, as excessive water can damage wood.
Treat any stains or spots with baking soda, water, or a specialized wood floor cleaner. Gently scrub the affected areas with a soft cloth or sponge.
3. Rinse:
Wipe the floor with a clean, damp cloth to remove any soap residue. Make sure the floor is completely dry before proceeding.
4. Natural Polish:
Mix equal parts of olive oil and white vinegar to create a natural wood floor polish. Add a few drops of essential oil like lemon or lavender for a pleasant scent. Apply a thin layer of this mixture to the floor using a soft cloth, working in small sections.
5. Buff:
After applying the natural polish, buff the floor with a clean, dry cloth to remove any excess oil and bring out the shine.
6. Regular Maintenance:
To maintain the shine, sweep or vacuum regularly to prevent dirt and grit from scratching the surface. Wipe up spills promptly, and use furniture pads to protect against scratches and scuffs.
7. Reapply as Needed:
Depending on foot traffic, you may need to reapply the natural polish every few months or as desired to maintain the shine.
By following these steps, you can naturally restore and maintain the shine of your wood floors without harsh chemicals or commercial products.
Conclusion
In conclusion, sanding hardwood floors is a meticulous yet rewarding process that can breathe new life into your living space. By following the steps outlined in this guide, you can achieve a smooth and polished surface that enhances the beauty and durability of your hardwood flooring. Remember to prioritize safety, use the right equipment, and take your time to ensure a flawless finish. With patience and attention to detail, your hardwood floors will shine and provide years of aesthetic appeal and functionality.