Hey there, fellow car enthusiasts! If you're like me, you take immense pride in your vehicle's appearance. Whether you're aiming to restore your car's original shine or preparing it for a fresh coat of paint, wet sanding is a crucial step in achieving that flawless finish. In this guide, I'll take you through the art of wet sanding a car, sharing my own experiences and tips to ensure your ride looks its absolute best. Buckle up because we're about to dive into the world of wet sanding!

Wet sanding is a car refinishing technique used to smooth out the surface of a vehicle's paint or clear coat. It is typically performed as part of the automotive detailing or painting process to remove imperfections, such as orange peel (a texture that resembles the skin of an orange) or minor surface defects like scratches, swirl marks, or paint runs. Wet sanding is a meticulous process that requires careful attention to detail and the use of specific materials and techniques.
When do you wet sand a car?
Wet sanding a car is typically done during the automotive refinishing or restoration process to remove imperfections in the paint and achieve a smooth and even surface. Here are some common situations when you might want to wet sand a car:
- Paint Imperfections: Wet sanding is often used to remove imperfections in the paint, such as orange peel (uneven texture), runs, drips, or dust particles that have settled on the surface during painting.
- Color Matching: When blending new paint with existing paint on a car, wet sanding may be necessary to feather the edges and achieve a seamless transition between the two.
- Clear Coat Repair: If the clear coat on your car has become damaged or developed blemishes like scratches or oxidation, wet sanding can be used to remove the damaged clear coat and prepare the surface for refinishing.
- Surface Preparation: Before applying a new coat of paint, primer, or clear coat, wet sanding can be used to create a smooth and clean surface for better adhesion and a more professional finish.
- Restoration: During the restoration of vintage or classic cars, wet sanding is often employed to strip away old layers of paint and achieve a clean canvas for a fresh coat of paint.
- Customization: Some car enthusiasts use wet sanding to create custom paint jobs, graphics, or designs on their vehicles. It allows for precise shaping and detailing.
Secret! How long to wait before wet sanding?
Wait at least 24 hours before wet sanding to ensure the surface has fully dried and cured. However, drying times may vary depending on factors like temperature and humidity, so check the manufacturer's instructions for specific guidance.
How long does it take to wet sand a car?
The time it takes to wet sand a car depends on several factors, including the size of the vehicle, the extent of imperfections in the paint, and your experience level.
Generally, for a small to mid-sized car with minor imperfections, it can take anywhere from 4 to 8 hours. This includes the time required to wash the car, mask off areas that should not be sanded, and the actual sanding process.
For larger vehicles or cars with more extensive imperfections, it could take longer, possibly up to 12 hours or more.
It's crucial to take your time and work meticulously to achieve the desired results. Rushing through the process can lead to subpar outcomes, so patience and attention to detail are key when wet sanding a car.
Wet Sanding a Car: DIY Guide
Wet sanding is a technique used to smooth out the surface of a car's paint, removing imperfections such as orange peel texture, runs, and other minor blemishes. It's important to note that wet sanding should be done with caution and care, as it involves abrasively removing a layer of paint. Here's a step-by-step guide on how to wet sand a car:
Materials You’ll Need:
- Car wash soap
- Bucket
- Hose or pressure washer
- Microfiber towels or a wash mitt
2. Wet Sandpaper:
- You'll typically use grits ranging from 800 to 3000. Start with coarser grits for deeper imperfections and progress to finer grits for a smoother finish.
3. Sandpaper Block or Pad:
- This provides a flat surface for even sanding.
4. Water Source:
- You'll need a constant supply of clean water to rinse the surface as you sand.
5. Rubbing Compound or Polishing Compound:
- To remove sanding marks and restore shine.
6. Buffer or Polisher (optional):
- Makes the polishing process faster and more efficient.
Safety Precautions:
- Work in a well-ventilated area.
- Wear safety goggles and a dust mask to protect your eyes and lungs.
- Keep the work area and your hands clean to avoid contaminating the sandpaper.
- Be patient and take your time; rushing can lead to paint damage.
Wet Sanding a Car: Steps by Step
1. Prepare the Car:
- Wash the car thoroughly to remove dirt and contaminants. This ensures you don't grind particles into the paint during sanding.
- Dry the car completely.
2. Choose the Right Grit:
- Start with a coarse grit (e.g., 800 or 1000) for heavier imperfections and then gradually move to finer grits (e.g., 1500, 2000, 3000) for smoother results.
3. Wet Sanding:
- Fill a bucket with clean water and soak the sandpaper for a few minutes.
- Dip the sandpaper in water periodically as you work to keep it wet.
- Sand in a back-and-forth or circular motion, applying even pressure.
- Keep the surface lubricated with water to prevent overheating and paint damage.
- Continue sanding until you've removed the imperfections and the surface feels smooth to the touch.
- Rinse the area frequently to remove debris.
4. Inspect Your Progress:
- Dry the sanded area and check for remaining imperfections. If necessary, repeat the wet sanding process with a finer grit until you're satisfied with the smoothness.
5. Polish the Surface:
- Apply rubbing compound or polishing compound to a clean, damp microfiber cloth or pad.
- Buff the sanded area in circular motions until the paint regains its shine.
- You can also use a buffer or Polisher for this step.
6. Final Clean and Protect:
- Wash the car again to remove any remaining compound residue.
- Apply a wax or sealant to protect the newly sanded and polished area.
Remember that wet sanding requires skill and patience. If you need more confidence in your abilities, consider seeking professional help to avoid damaging your car's paint. Additionally, this process is typically best for localized imperfections rather than the entire car.
Stop wet sanding when the surface is smooth, imperfections are removed, and you've achieved the desired level of finish. Check for uniformity, feel for smoothness, and periodically rinse the area to assess progress.
Check out the video below to learn more about wet sanding a car:
Wet Sand vs Dry Sand Car
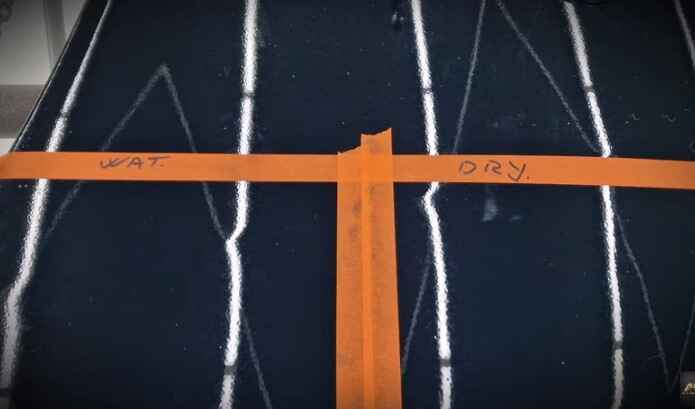
"Wet sand" and "dry sand" in the context of cars typically refer to two different methods of preparing the surface of a car's paint for various automotive refinishing processes, such as painting or polishing. Here's what each term means:
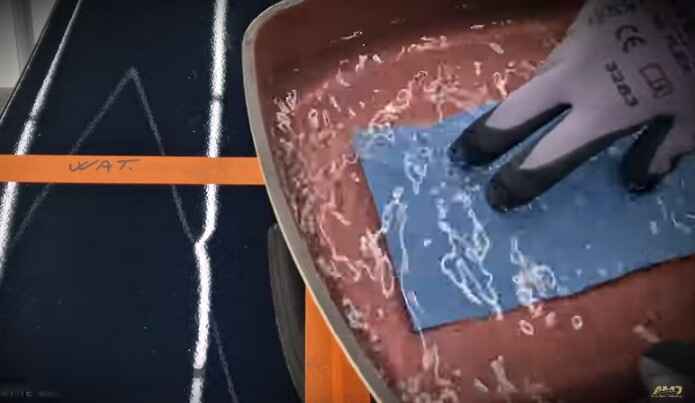
Wet Sanding:
- Wet sanding involves sanding the car's paint surface with sandpaper while using water as a lubricant. The sandpaper used is typically a high-grit abrasive paper.
- This technique is often used to smooth out imperfections in the paint, such as orange peel texture (a bumpy or dimpled appearance) or runs (excess paint buildup). Wet sanding can also remove scratches and other surface defects.
- The water helps to carry away the sanding residue and keeps the sandpaper from clogging.
- After wet sanding, the car's surface may look dull and hazy. Polishing and buffing are usually required to restore the shine.
Dry Sanding:
- Dry sanding is the process of sanding the car's paint surface with sandpaper without using water as a lubricant.
- It is generally used for more aggressive paint removal or surface leveling when wet sanding might not be suitable. Dry sanding can be faster but may generate more dust and heat, which can damage the paint if not done carefully.
- Dry sanding may also be used in the initial stages of automotive bodywork, where the goal is to remove old paint or repair damaged areas before priming and repainting.
The choice between wet sanding and dry sanding depends on the specific requirements of the automotive refinishing job. Wet sanding is often preferred for fine finishing and smoothing out imperfections, while dry sanding may be chosen for more aggressive paint removal or initial surface preparation. Both techniques require skill and care to avoid damaging the car's paint finish, so they are typically performed by professionals or experienced DIY enthusiasts.
Best sandpaper for wet sanding a car
The choice of the best sandpaper for wet sanding depends on the specific task and your preferences. Here are some factors to consider when selecting sandpaper for wet sanding a car:
1. Grit Size:
- Coarser grits (e.g., 400 to 800) are suitable for removing imperfections like orange peel, paint runs, or heavy scratches.
- Medium grits (e.g., 1000 to 2000) are ideal for preparing the surface for primer or a new coat of paint.
- Fine grits (e.g., 3000 to 5000) are used for final smoothing and blending, ensuring a smooth finish before polishing.
2. Wet/Dry Sandpaper:
- Always use sandpaper specifically designed for wet sanding. Wet/dry sandpaper is made to withstand moisture and provide better results when used with water or a lubricant.
3. Sandpaper Backing:
- Sandpapers come with different types of backing, such as paper, cloth, or film. Paper is common but can deteriorate when wet. Wet/dry sandpaper with a waterproof backing, like Mylar or film, is more durable and long-lasting.
4. Brand and Quality:
- Stick to reputable brands that are known for producing high-quality automotive sandpaper. Brands like 3M, Norton, Mirka, and Meguiar are well-regarded in the automotive industry.
5. Abrasive Material:
- Sandpapers use various abrasive materials, including aluminum oxide, silicon carbide, and ceramic. Silicon carbide is often preferred for wet sanding, as it maintains its cutting ability when wet.
6. Compatibility with Sanding Blocks:
- Consider whether you'll be using sanding blocks or by hand. Some sandpapers are designed specifically for use with sanding blocks, while others are better suited for hand sanding.
7. Personal Preference:
- Your personal preference and experience also play a role. Some automotive enthusiasts and professionals have specific preferences for certain brands or types of sandpaper based on their experience and the results they achieve.
In summary, the best sandpaper for wet sanding a car depends on the specific task and your preferences. For general wet sanding, starting with 1000 to 2000 grit and finishing with 3000 to 5000 grit, wet/dry sandpaper is a common approach. Be sure to use quality sandpaper from a reputable brand to achieve the best results while protecting your car's finish. Additionally, always follow proper wet sanding techniques and safety precautions.
How much does it cost to wet sand a car?
The cost of wet sanding a car can vary depending on several factors, including the extent of the work required, the size and type of the vehicle, and where you have the work done. Wet sanding is a process used to remove imperfections and restore the finish of a car's paint, typically as part of a larger refinishing or detailing project. Here are some factors that can influence the cost:
- Size of the Vehicle: Larger vehicles will generally require more time and materials so they will cost more to wet sand.
- Extent of Imperfections: If your car has minor imperfections, such as light scratches or swirl marks, it may require less extensive wet sanding compared to a car with deep scratches, peeling paint, or significant oxidation. More extensive work will cost more.
- Professional vs. DIY: If you choose to do the wet sanding yourself, you'll only need to consider the cost of materials, such as sandpaper, water, and polishing compounds. Hiring a professional will typically cost more due to labor charges.
- Location and Labor Rates: Labor rates can vary widely depending on your location and the expertise of the professionals you hire. In areas with a higher cost of living, you can expect to pay more for services.
- Additional Services: Wet sanding is often part of a larger detailing or refinishing process, which may include compounding, polishing, and waxing. The overall cost may include these additional services.
- Quality of Materials: The type and quality of sandpaper, compounds, and polishes used can impact the cost. Higher-quality materials may cost more but can yield better results.
- Customization: If you have specific requests or want to achieve a particular finish, it may require additional time and effort, increasing the cost.
To get an accurate estimate for wet sanding your car, it's best to consult with a professional auto detailing or refinishing service in your area. They can assess the condition of your vehicle and provide you with a quote based on your specific needs. Prices can range from a few hundred dollars for minor work to over a thousand dollars for extensive wet sanding and refinishing on a larger vehicle.
Secret! How much to wet sand a car?
The cost to wet sand a car can vary widely depending on factors like the size of the vehicle, the extent of the sanding needed, and the location. Generally, it can range from $150 to $600 or more for a professional service.
What to do after wet sanding a car?
After wet sanding a car, you need to follow a series of steps to ensure that the paint finish looks smooth, glossy, and well-protected. Wet sanding is typically done to remove imperfections in the paint, such as orange peel texture, scratches, or other blemishes. Here's what to do after wet sanding a car:
- Rinse Thoroughly: Begin by thoroughly rinsing the sanded areas with clean water. Make sure you remove all the sanding residue and any loose debris. You can use a hose or a bucket of water to do this.
- Dry the Surface: Use a clean, soft, and lint-free microfiber or chamois cloth to dry the sanded areas. Ensure that there is no residual water on the surface before moving on.
- Inspect for Imperfections: Carefully inspect the sanded areas under good lighting conditions. Look for any remaining imperfections, deep scratches, or areas that might need further attention.
- Apply Polish or Compound: If there are still imperfections or if the paint looks dull, you may need to use a cutting compound or a polish. Apply a small amount of compound or polish to a clean applicator pad or polishing machine and work it into the surface. Follow the manufacturer's instructions for the specific product you're using.
- Polish the Surface: Use a polishing machine or a hand applicator pad to distribute the compound or polish over the sanded area evenly. Work in small sections and use gentle, overlapping motions. Polish until you achieve the desired level of gloss and smoothness.
- Wipe Clean: After polishing, use a clean microfiber cloth to wipe off the excess polish or compound. Make sure the surface is clean and free from any residues.
- Apply Wax or Sealant: To protect the newly polished paint and enhance its shine, apply a high-quality wax or sealant. Follow the instructions on the wax or sealant product for the best results. Waxing or sealing also helps to provide a protective layer against environmental elements.
- Buff and Shine: After the wax or sealant has cured (usually after a few minutes to an hour, depending on the product), use a clean and dry microfiber cloth to buff the surface. This will bring out the shine and ensure a smooth finish.
- Final Inspection: Inspect the entire car's surface again to make sure there are no remaining imperfections or areas that need further attention.
- Protect and Maintain: To maintain the newly restored finish, regularly wash and wax your car, and take steps to protect it from environmental damage, such as parking in the shade and avoiding harsh chemicals.
Remember that wet sanding and polishing can be a labor-intensive process, so take your time and be patient to achieve the best results. If you need more confidence in your abilities, it's a good idea to seek professional help or guidance from experienced auto detailers.
Benefits of wet sanding a car
Wet sanding a car is a process used to improve the finish and appearance of the vehicle's paint job. It involves sanding the car's surface with abrasive materials while keeping it wet with water or a lubricating solution. Here are some benefits of wet sanding a car:
- Smooth Finish: Wet sanding helps to smooth out imperfections in the paint surface, such as orange peel texture, dirt, runs, and small scratches. This results in a much smoother and more even finish.
- Removal of Paint Defects: It is an effective method for removing paint defects like clear coat scratches, bird droppings, water spots, and other surface contaminants that cannot be easily removed with traditional cleaning or polishing methods.
- Preparation for Painting: Before repainting a car or applying a new layer of clear coat, wet sanding is often used to create a clean, uniform surface for the new paint to adhere to. This ensures better adhesion and a more professional finish.
- Restoration: Wet sanding can restore older and faded paint jobs by removing a thin layer of the damaged paint and revealing a fresh layer underneath. This can make the car look newer and more attractive.
- Color Matching: When blending new paint into existing paintwork, wet sanding can help achieve a seamless transition between the old and new paint, improving color matching and overall appearance.
- Polishing: Wet sanding is typically followed by a polishing and buffing process, which enhances the shine and luster of the paint. This results in a high-gloss finish that can make the car look like new.
- Paint Correction: Professional detailers often use wet sanding as part of a paint correction process to eliminate swirl marks, fine scratches, and other minor defects in the paint, resulting in a showroom-quality finish.
- Customization: Wet sanding can be used to achieve custom paint finishes, including matte and satin looks, as well as achieving a mirror-like, glassy finish on high-end luxury cars.
- Increased Resale Value: A well-maintained and properly finished paint job can significantly increase the resale value of a vehicle. Wet sanding can achieve a pristine appearance, making the car more appealing to potential buyers.
It's important to note that wet sanding should be performed carefully and by experienced individuals, as improper technique or the use of the wrong abrasive materials can damage the paint or clear coat. Additionally, it's advisable to wear protective gear and follow safety precautions when working with abrasive materials and water.
Conclusion
In conclusion, wet sanding a car is a meticulous yet rewarding process that can help achieve a smooth and flawless finish. By following the steps carefully, using the right materials, and exercising patience, you can remove imperfections and achieve a professional-looking result. Remember to prioritize safety, wear appropriate protective gear, and take your time to ensure the best outcome. Regular maintenance and proper finishing techniques will not only enhance your car's appearance but also protect its paint job, ultimately extending its lifespan and preserving its aesthetic appeal.
Frequently Asked Questions
Do you wet sand a car after painting?
Wet sanding a car after painting is a common practice in automotive finishing. It involves using wet sandpaper and water to smooth out imperfections, orange peel, or other defects in the paint job. This process helps achieve a smooth and glossy finish before applying final polishing and waxing.
Can you polish a car without wet sanding?
Yes, you can polish a car without wet sanding. Polishing involves using a machine or hand applicator to remove minor imperfections and enhance the paint's shine. Wet sanding is a more aggressive technique for deeper scratches and should only be used when necessary.
Can you wet sand a car before wax?
Yes, you can wet sand a car before waxing to remove imperfections and improve the paint's finish. Wet sanding helps smooth out the surface by removing minor scratches and contaminants, making it an effective step in the car detailing process before applying wax for a glossy shine.
How to get rid of sanding marks on car?
To remove sanding marks on a car's paint finish, follow these steps:
- Wash the car thoroughly to remove dirt and debris.
- Inspect the sanding marks to determine their severity.
- Use a mild abrasive polish or rubbing compound with a foam or microfiber applicator pad.
- Apply the polish or compound in a circular motion, working in small sections.
- Buff the area with a clean, soft microfiber cloth.
- Repeat as needed, gradually decreasing the pressure to blend the area with the surrounding paint.
- Finish with a high-quality car wax or sealant to protect the paint.
For deep or extensive sanding marks, consider professional refinishing.
How to use wet and dry sandpaper on a car?
To use wet and dry sandpaper on a car, follow these steps:
- Soak the sandpaper in water for a few minutes.
- Wet the car's surface you want to sand.
- Hold the sandpaper firmly and sand in a circular or back-and-forth motion.
- Keep the surface wet throughout the process.
- Check your progress regularly.
- Use finer grits for a smoother finish.
- Rinse the car and sandpaper often.
What grit sandpaper for wet sanding a car?
For wet sanding a car, start with 800 to 1000 grit sandpaper to remove imperfections and roughness. Then, progress to 1500 to 2000 grit for finer smoothing. Finally, use 3000 to 5000 grit for a smooth finish before polishing. Always keep the sandpaper wet to prevent damage and ensure a glossy result.