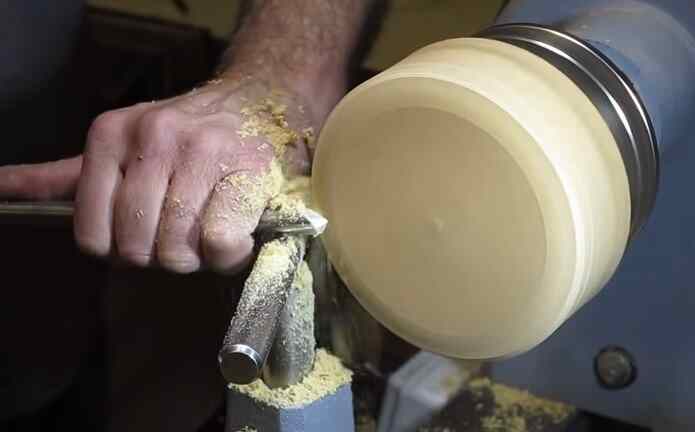
To use a bowl gouge, secure the bowl blank on the lathe, position the tool rest close to the wood, and hold the gouge at a slight angle. Gradually engage the cutting edge while maintaining a smooth and controlled movement to shape the bowl.
Ready to sculpt stunning wooden bowls? The key lies in mastering the art of the bowl gouge. For beginners, understanding this versatile tool is the gateway to unlocking a world of creative woodworking. In this guide, we'll demystify the bowl gouge, offering practical insights and tips to help you confidently navigate the turning process. From choosing the right gouge to mastering essential techniques, this blog post is your go-to resource for elevating your woodworking game. Let's dive into the fundamentals of using a bowl gouge and bring your woodturning projects to life!

Choosing the right size bowl gouge depends on several factors, including the size of the bowl you're turning, the type of wood you're working with, your skill level, and personal preference. Here are some considerations to help you determine what size bowl gouge to use:
1. Bowl Size:
A smaller bowl gouge (around 3/8" to 1/2" diameter) is suitable for smaller bowls and delicate work.
For medium-sized bowls, a gouge with a 1/2" to 5/8" diameter is a good choice.
Larger bowls or roughing out work may require a larger gouge with a 5/8" to 3/4" or even larger diameter.
2. Wood Type:
Hardwoods tend to be more challenging to turn than softwoods. If you're working with hardwoods, consider a larger gouge to help with the additional cutting resistance.
For softer woods, a smaller gouge may suffice.
3. Skill Level:
Beginners often find it easier to control smaller gouges, so starting with a 3/8" or 1/2" gouge is common. As you gain experience and confidence, you can experiment with larger gouges.
4. Personal Preference:
Some woodturners prefer the feel and control of a particular size gouge, which may become their go-to tool for most projects.
Personal comfort and ease of use play a significant role in determining your preference.
5. Project Specifics:
Consider the details of your project. A larger gouge can remove material more efficiently if you're roughing out a large bowl blank. For finer finishing cuts, a smaller gouge might be preferred.
6. Lathe Size:
The size and power of your lathe can also influence your choice of the gouge. A larger lathe can handle larger gouges more effectively.
7. Versatility:
If you want a versatile option, a 1/2" or 5/8" gouge can be a good compromise, as it can handle various bowl sizes and wood types.
8. Hollowing vs. Roughing:
For hollowing the interior of a bowl, you may prefer a gouge with a swept-back grind and a more pointed profile. These gouges allow for better access and control inside the bowl.
Ultimately, the size of the bowl gouge you choose is a matter of personal preference and experience. It's a good idea to have a few different sizes in your tool collection, and over time, you'll develop a sense of which works best for specific tasks. Experimentation and practice will help refine your skills and find the right tools for your woodturning projects.
How do you properly hold a bowl gouge?

Holding a bowl gouge properly is crucial for safe and effective woodturning. A bowl gouge is a specialized woodturning tool used to shape and hollow out the interior of bowls and other turned objects. Here's how to properly hold a bowl gouge:
1. Wear Safety Gear:
Before you start, wear appropriate safety gear, including safety glasses or a face shield to protect your eyes, a dust mask to protect your lungs, and possibly hearing protection if your lathe is particularly noisy.
2. Position Your Body:
Stand or sit comfortably at the lathe, keeping your body balanced and your feet shoulder-width apart. Position yourself so that you have good visibility of the workpiece and can move freely.
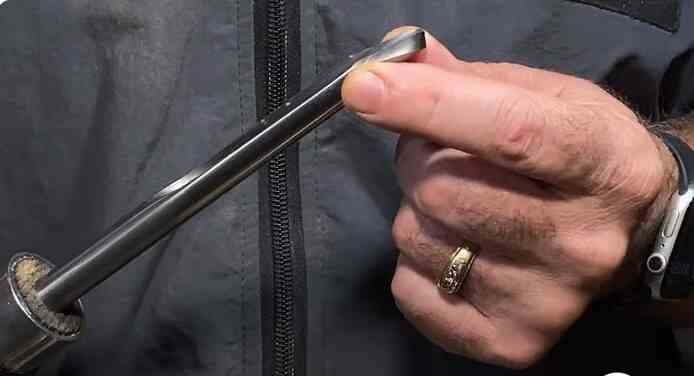
3. Grip the Handle:
Grasp the handle of the bowl gouge firmly with your dominant hand. Your thumb should be on top of the handle while your fingers wrap around the handle from below. Ensure a secure grip, but avoid over-gripping, which can lead to fatigue.
4. Rest the Tool Rest:
Adjust the tool rest on your lathe to the appropriate height and distance from the workpiece. The tool rest should be close enough to support the gouge but not so close that it interferes with the cutting action.
5. Angle of Attack:
Hold the bowl gouge at a slight angle to the tool rest. The bevel of the gouge should rest on the tool rest while the cutting edge is above the workpiece.
6. Engage the Bevel:
Gently bring the bowl gouge into contact with the spinning workpiece before cutting. The bevel should touch the wood first, guiding and stabilizing the tool.
7. Control the Cut:
Gradually lift the handle while maintaining contact with the bevel. The cutting edge will begin to engage the wood, removing material. Use gentle and controlled movements to shape the bowl as desired.
8. Tool Presentation:
Depending on the shape you're trying to achieve, you may need to vary the angle and orientation of the gouge. Experiment with different angles to achieve the desired results.
9. Cutting Technique:
For roughing out the interior of a bowl, you might use a shearing cut or a scraping cut. You can use a more delicate cutting action for finer detail work, such as shaping the curves.
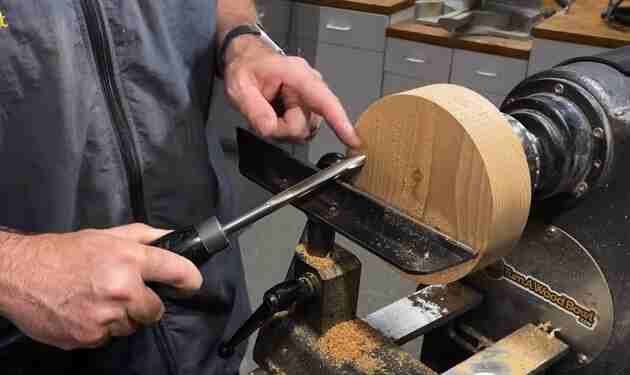
10. Maintain Sharpness:
Keep your bowl gouge sharp by regularly sharpening it using a sharpening jig or system. A sharp tool is safer and more effective.
11. Practice:
Bowl gouge techniques improve with practice. Start with simple projects and gradually work to more complex ones as you gain confidence and experience.
Remember that safety is paramount when using any woodworking tool. Always follow proper safety procedures and take your time to develop your skills when using a bowl gouge or any other woodturning tool.
What is the best angle for a bowl gouge?
The best angle for a bowl gouge can vary depending on the type of wood you are turning, the specific cut you want to make, and your personal preference. However, some general guidelines can help you determine the best angle for your bowl gouge:
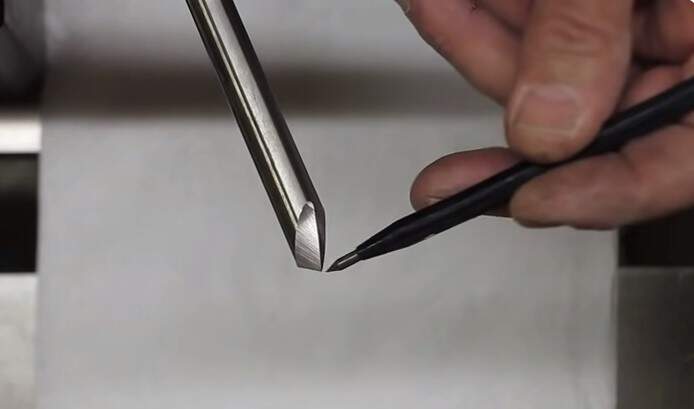
1. Bevel Angle:
The bevel angle refers to the angle at which the bevel of the gouge meets the surface of the wood. A common bevel angle for bowl gouges is around 40 to 45 degrees. This angle allows for good control and efficient wood removal.
2. Cutting Edge Angle:
The cutting edge angle is formed by the gouge flute and the wood's surface. This angle is typically between 50 to 60 degrees for bowl gouges. A slightly higher cutting edge angle can give you more control and a cleaner cut.
3. Swept-Back Wings:
Many bowl gouges have swept-back wings, which curve away from the cutting edge. This design helps prevent catches and provides a smoother cut. A gentle sweep of around 20 degrees is common for the wings.
4. Bevel Length:
The length of the bevel can also affect your control and the type of cut you make. A longer bevel allows for more surface contact with the wood, enhancing stability. However, a shorter bevel can be useful for making more delicate cuts.
5. Adjusting for Wood Hardness:
You may need to adjust the angles mentioned above based on the wood you're turning hard. Softer woods may require a slightly steeper bevel angle, while harder woods may benefit from a shallower angle.
Ultimately, the best angle for your bowl gouge will come with practice and experience. You should experiment with different angles to see what works best for your specific projects and preferences. Remember that sharpening your gouge to maintain a consistent angle is crucial for achieving clean and efficient cuts.
How to use a bowl gouge for the first time?
The prospect can be daunting if you've never used a bowl gouge before. But don't worry - you'll be an expert with a bit of practice. Here's a step-by-step guide to using a bowl gouge for the first time.
1. Safety first
Before you start, you must ensure you're taking all the necessary safety precautions. Wear protective clothing, including gloves, goggles and a dust mask.
2. Select the right gouge
Different types of bowl gouges are available, so it's important to select the one that's right for the job. If you're unsure, ask a staff member at your local woodworking store for advice.
3. Set up your work area
Ensure you have a stable work surface and all the other tools you need within reach. This includes a sharpening stone, which you'll need to keep your gouge in good condition.
4. Start with a small piece of wood
It's best to start with a small amount of wood until you get the hang of using the gouge. This will help to prevent any accidents.
5. Position the gouge correctly
You need to hold the gouge at the right angle to use it effectively. The cutting edge should be facing downwards, at a 30-degree angle to the wood.
6. Apply pressure evenly
When you start to cut into the wood, apply pressure evenly. Avoid putting too much pressure on the gouge, as this can cause it to break.
7. Follow the grain of the wood
When using the gouge, always follow the grain of the wood. This will produce a smoother finish.
8. Use short, controlled strokes
Use short, controlled strokes when cutting into the wood to get the best results. It's also essential to keep the gouge moving to avoid damaging the wood.
9. Finish up
Once you've finished using the gouge, clean it off with a cloth and store it safely away.
With a bit of practice, you'll be using a bowl gouge like a pro in no time. Remember to take all the necessary safety precautions and follow the wood grain.
Related: Here are 22 uses for wood chisels explained by professionals
How to use a bowl gouge video
What are some tips for using a bowl gouge correctly?
If you're new to woodturning, the bowl gouge can seem daunting. But with a bit of practice and these seven tips, you'll be using it like a pro in no time!
1. Use a light touch.
When using a bowl gouge, it's important to use a light touch. You don't want to apply too much pressure or risk damaging the wood. Instead, let the weight of the gouge do the work for you.
2. Keep the tool sharp.
A dull bowl gouge is more likely to cause damage to the wood. So, be sure to keep your tool sharp. You can use a honing guide and a sharpening file to keep the edge nice and sharp.
3. Use the right bevel angle.
The bevel angle is the angle between the cutting edge and the body of the gouge. You'll want to use a bevel angle between 30 and 40 degrees for bowl gouging. This will give you the best results.
4. Don't try to take too big of a cut.
When using a bowl gouge, it's important to take small cuts. If you try to take too big of a cut, you'll risk damaging the wood or causing the gouge to catch. So instead, take small, shallow cuts.
5. Keep the tool steady.
When using a bowl gouge, it's important to keep the tool steady. This will help you avoid damaging the wood. Apply pressure evenly, and don't try to force the gouge through the wood.
6. Follow the grain of the wood.
When using a bowl gouge, it's important to follow the grain of the wood. This will help you avoid damage to the wood and create a smoother surface.
7. Use a slow, steady motion.
When using a bowl gouge, it's important to use a slow, steady motion. This will help you avoid damage to the wood and create a smoother surface. If you try to go too fast, you'll risk damaging the wood or causing the gouge to catch.
Final Words
So there you have it - a few tips on how to use your bowl gouge. Remember, practice makes perfect, so don't be afraid to experiment with different techniques and speeds. And most importantly, have fun! With a bit of practice, you'll be turning bowls like a pro in no time.